PHP-FPM brings a number of performance and resource-management benefits, which is why it’s often paired with Nginx by default. However, many developers and administrators still prefer the flexibility and convenience of Apache, especially features like .htaccess files, per-directory overrides, and its familiar module ecosystem. So what happens when you want the best of both worlds: Apache’s ease of use and PHP-FPM’s performance advantages? The good news is that Apache includes a dedicated module that makes this combination seamless.
In this guide, we’ll walk through the entire setup from the ground up, using a fresh Ubuntu 14.04 server as our reference environment. For simplicity, we’ll assume that all websites hosted on this server will share a single PHP-FPM pool, though the same approach can be adapted for more advanced configurations.
Let’s get started by installing the essential packages required for Apache, PHP-FPM, and the modules that allow them to work together:
[root@janus01:~# apt-get update
[root@janus01:~# apt-get install php5-fpm apache2 libapache2-mod-fastcgi
Next, update your Apache configuration so it uses the mpm_event module instead of the default mpm_prefork module:
[root@janus01:~# a2dismod php5
[root@janus01:~# a2enmod actions
[root@janus01:~# apache2ctl -M | grep mpm
[root@janus01:~# a2dismod mpm_prefork
[root@janus01:~# a2dismod mpm_worker
[root@janus01:~# a2enmod mpm_event
Next, you’ll need to instruct Apache to hand off all PHP-related requests to PHP-FPM. To do this, we’ll create a new configuration file that defines how Apache should communicate with the PHP-FPM service and how PHP files should be processed. This ensures that every .php request is routed efficiently through the PHP-FPM backend instead of being handled by Apache’s traditional PHP module.
Go ahead and create a new Apache configuration file to set up this behavior:
[root@janus01~]# nano /etc/apache2/conf-available/php5fpm.conf

<IfModule mod_fastcgi.c>
        AddHandler php5.fcgi .php
        Action php5.fcgi /php5.fcgi
        Alias /php5.fcgi /usr/lib/cgi-bin/php5.fcgi
        FastCgiExternalServer /usr/lib/cgi-bin/php5.fcgi -socket /var/run/php5-fpm.sock -pass-header Authorization -idle-timeout 3600
        <Directory /usr/lib/cgi-bin>
                Require all granted
        </Directory>
</IfModule>
With the configuration file in place, the next step is to activate it so Apache can begin routing PHP requests through PHP-FPM. Enabling this file tells Apache to load and apply the new settings you’ve just created, ensuring that your server uses the updated PHP handling logic moving forward.
Now, enable the new Apache PHP configuration:
[root@janus01:~# a2enconf php5fpm.conf
Before moving on, it’s important to verify that PHP-FPM is configured to use Unix sockets rather than TCP connections. Using sockets typically offers better performance and lower overhead on a local server setup. While checking this, you’ll also want to confirm a few additional settings to ensure optimal communication between Apache and PHP-FPM.
Take a moment to review the PHP-FPM configuration and make sure the following options are correctly set:
[root@janus01:~# vim /etc/php5/fpm/pool.d/www.conf
; listen = 127.0.0.1:9000
listen = /var/run/php-fpm.sock
...
listen.owner = www-data
listen.group = www-data
listen.mode = 0660
user = www-data
group = www-data
Once all configuration updates are complete, the final step is to restart both Apache and PHP-FPM. Restarting these services ensures that all new settings are loaded and actively applied, allowing your server to run with the updated PHP processing configuration.
Now, restart Apache and PHP-FPM to apply the changes:
[root@janus01:~# service apache2 restart
[root@janus01:~# service php5-fpm restart
If your server is protected by a software firewall, you’ll need to ensure that HTTP and HTTPS traffic can reach your web server. This means opening ports 80 (for standard web traffic) and 443 (for secure HTTPS traffic). The following example shows how to allow these ports for all incoming connections. Be sure to adjust the rules to match your own security requirements and restrict access as needed:
[root@janus01:~# ufw allow 80
[root@janus01:~# ufw allow 443
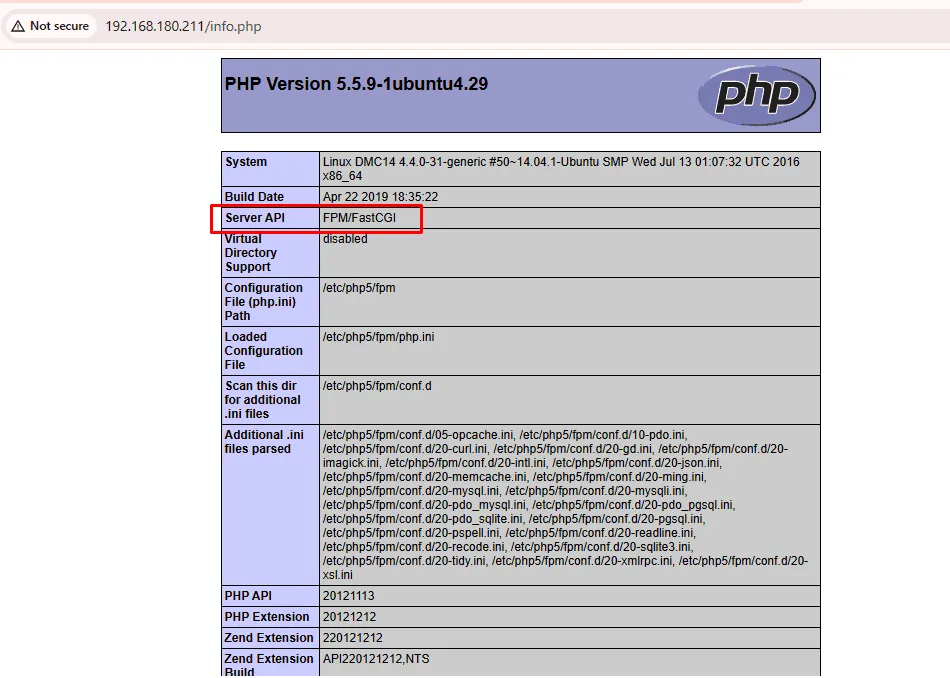
Finally, it’s time to verify that PHP is working correctly and that it’s being processed through PHP-FPM. To do this, create a simple test file in your web server’s root directory:
[root@janus01:~# nano /var/www/html/info.php
<?php phpinfo(); ?>
Once the file is created, open a web browser and navigate to http://x.x.x.x/info.php. You should see the PHP information page, which confirms that PHP-FPM is handling requests as expected.
And that’s it! Your Apache server is now fully configured to run PHP efficiently with PHP-FPM.
Leave a Reply